 I sell these triple spinners for $25 & a single for $10
I was recently shown how to make these pop or beer can wind spinners and I’ve even been selling a few with intent to sell more at my local Farmers Market and craft shows. Here’s my daughter holding one. I think they make for a great conversation piece, they’re beautiful spinning in the wind, and it’s a great way to upcycle! What do you think?
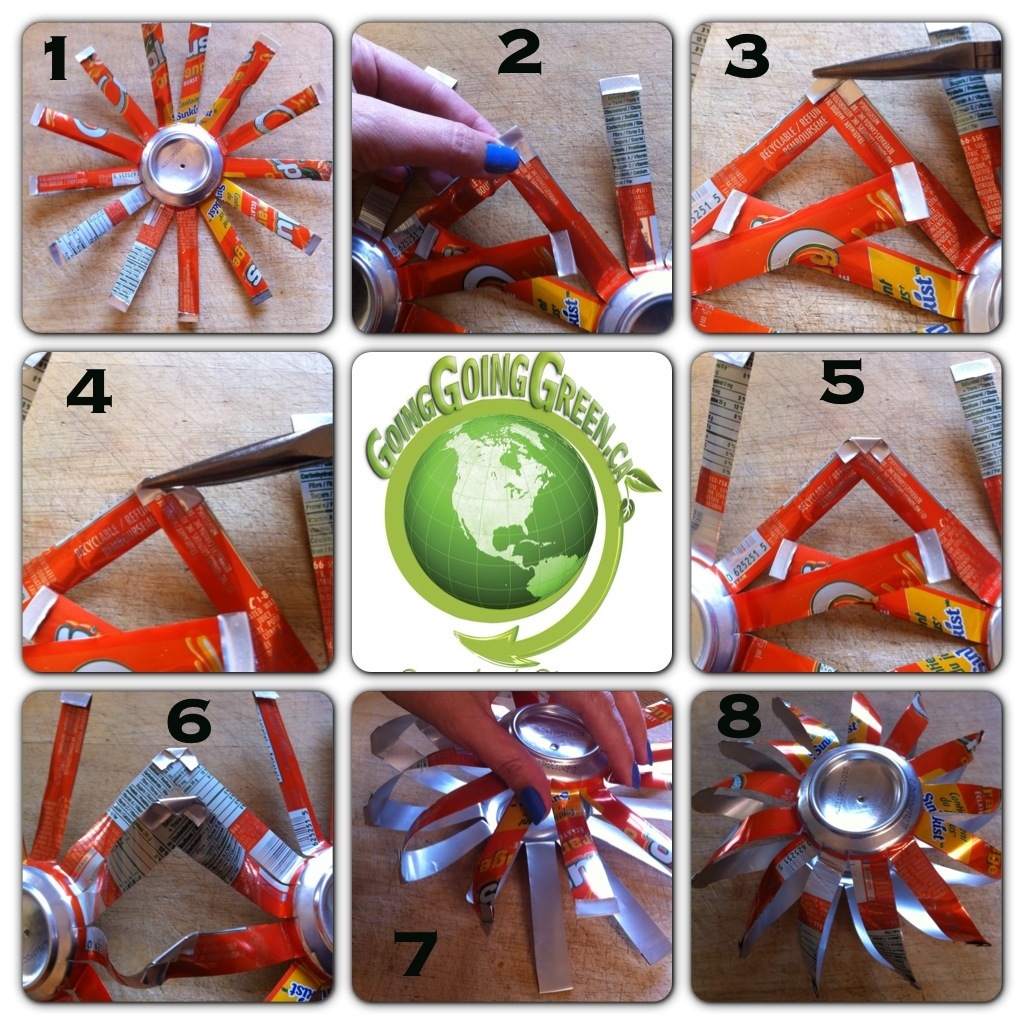
Here’s a 3 sets of pics detailing how to put the spinner together. I will work on the wording for a better explanation, when my internet’s working better.


Any questions? Feel free to comment below.
Toxic 12 Ingredients to avoid.
Essential oils…Essentially the right choice!
Thanks & have a Green day, Every day =)
Pam. Click here to Email Me or P: 780-296-4723 Epam@goinggoinggreen.ca SN:


can you show us how to make them? i’ve looked all over the internet and can’t find directions.
I wish I could. There are many steps. A single spinner (2 cans together) takes a while to make. Unfortunately, I broke my laptop with a webcam, th older one I use doesn’t have one, & my iPhone videos isn’t that great for making videos. Of course, typing out the instructions would be hard to put into words with photos. It’s a lot of time & skill that I just don’t have the resources to do, at this time. This could be a project for me in the future.
I have to focus on making a bunch more too. I sell them at trade shows and take orders for locals. Unfortunately, shipping costs have made it a deterant for further away customers. Thank you for visiting my site & for the idea for a video. Be sure to check back, in the future. Have a Green Day, Every Day =)
Hello! how about pictures of “key” steps? like pictures of what each can looks like after it’s cut, and how to put the 2 cans together? would be great! have a super day!
Indeed, that’s a lot of pics & typing but I will keep that in mind when I make them next. Stay tuned
I just can’t figure out how to put the can blades together!!!!!!!!
I will try to get a pic posted to show you how. Stay tuned.
thank you!
Hello! I am so pleased to tell you that I made one and it looks great!!! thanks to your pictures. would have never figured out the hooking of the strips. In your picture you show the 3 spinners connected by the metal tabs. but isn’t the actual spinner “threaded” in a piece of wire so it can spin?
Glad to help. I use 18 gauge galvanized steel (comes in a roll) & cut a piece, about 6.5 inches. At one end, I poke a hole through the end of the cans tab, use the needle nose pliers to bend a small part at one end, then squish the end to close. Add 3 beads, poke the wire through both ends of the spinner, add 3 more beads & finish that end the same way as the first. To attach another spinner, just attach the next one to its end tab.
I am busy this weekend, volunteering for Mothers Day brunch at the local hall. Early next week, I will put more pics together so you have a visual.
thanks so much for your help and patience. A neighbor of mine has one but I don’t know them enough to go over and look theirs over LOL. I know they bought them in Florida. I want to make them for gifts for my friends. Hope you have a great mother’s day and congrats on helping at the brunch. I will await your pictures when you return….thanks so much…Louise
Updated pic is posted for finalizing a spinner.
H Karla how many blades did you make?
I have 13 on mine. Best of luck & let me know how it goes or if you need any more tips!
I made my first one yesterday thanks to all your help. It only had 10 blades, I think more is needed like you said you did 13. No wind today but last night it was spinning. My first attempt was sloppy LOL, but I will get better at it. I will write if I need more help thanks SO much.
I have updated with a pic that shows how to put them together. Let me know if you need any more help.
thank you SO MUCH!!! i will give it a shot 🙂
Hi! Thanks for putting up the pictures to show how to connect the ‘blades’, but how do you attach them together, I have seen some with a straight wire going through and some with a fishing thing that with a loop on top and bottom to attach how do you attach them to each other. You ROCK for helping!
Glad to help. I use 18 gauge galvanized steel (comes in a roll) & cut a piece, about 6.5 inches. At one end, I poke a hole through the end of the cans tab, use the needle nose pliers to bend a small part at one end, then squish the end to close. Add 3 beads, poke the wire through both ends of the spinner, add 3 more beads & finish that end the same way as the first. To attach another spinner, just attach the next one to its end tab.
I am busy this weekend, volunteering for Mothers Day brunch at the local hall. Early next week, I will put more pics together so you have a visual.
Hi there ok how many blades do I make it seems like 12 in your pictures, I am giving it a shot today wish me luck LOL
Hello Louise, I’m happy to say that i’ve made 3 sets of spinners and they’re beautiful! they’re all in my front yard, I’m running into an issue though… the bottom 2 spin great with a light breeze, but not the top one. Have you run into this problem before? I know it’s not the can because I’ve swapped positions with others and the one that didn’t spin works great when it’s one of the bottom 2. the top one spins, but only with a stronger wind. On its own it will spin just fine. it’s just when i put it together with the other 2 that it doesn’t spin freely.
I haven’t noticed that problem. Maybe it’s just a wind issue lol. I’m so happy to hear that you’re able to make them now. Enjoy!
Actually I only made a two can spinner which turned out to be one. I haven’t done enough to attach them yet to see what you mean. When I do, which will be this week, I will let you know. By the way can you send me pictures? My email is louise.cerrone@yahoo.com or on FB Louise Cerrone Bell I would love to share our spinners LOL
Louise, to get the 13 blades make the width of each blade 1/2 inch + 2 little ticks. One will be a little bit wider than the others. To make it look good, when you put them together, make sure you match the 2 wide ones first. Pam had been so kind to share her knowledge, I figure I’ll share some of the things i’ve learned too. karla
Ok so I made one yesterday with 13 blades, not bad for the second time around. My problem is this, they spin lopsided LOL…I think some of the blades are not the exact length so the cans don’t hang straight if you know what I mean. Karla what do you mean 2 little ticks? They are spinning but spinning crooked. Do you mean two little tricks? Put the two thick ones together first? Thanks guys!
by “2 little ticks” i mean 1/2 inch, and if you’re looking at a ruler, 2 more tick marks (2 tiny lines past the 1/2 inch mark). an additional 2/8s past the 1/2 inch mark.
First I want to thank you ALL for helping me make can spinners!!! they still are a bit lopsided but they spin beautifully. My friends are loving mine, so at night when I need to relax I make them for my neighbors. An idea for beads, I have BOXES of my late mom’s costume jewelry, so I am cutting the necklaces and using her beads to put on wire. Kind of a good feeling to use them and I feel like I am remembering her as well. Thanks everyone. If you have any idea why mine are lopsided let me know. Love you all. Thanks
ok is that why mine are lopsided? LOL, they are not spinning today it is pouring here in CT
you have to be careful when you punch the holes in the 2 cans they are identical or it will spin lop sided ..just saying ..
The ones we made with fish line have broken. Where do you get the 18 Gage steel wire?
Sorry to hear. I got it from Home Depot in a small spool. Check with a local hardware store and I’m sure they can set you up with some.